University team project · James Madison University
A musical instrument you play with blocks
Our team designed a proof-of-concept instrument for an elementary-school student with a disability. Instead of asking the student to learn a conventional instrument, we turned something they already enjoyed, playing with large LEGO-style blocks, into the way to make music.
Project status: Team project · working proof of concept
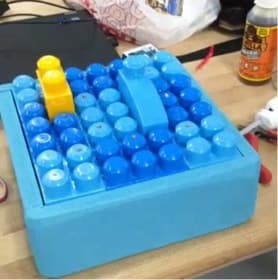
Instead of making the user adapt to the mechanism, we adapted the mechanism to the user's natural interaction.
01Requirements
Start from what the user already enjoys
A conventional instrument wasn't a good fit, so the interaction had to come from somewhere else.
Our client was an elementary-school student with a disability who had very limited ability to operate conventional musical instruments.
Requirements gathering changed the question. Early on, we learned the student especially enjoyed playing with large LEGO-style blocks. That was an interaction they already had and liked, so we designed the instrument around it.
02System
Turning blocks into an interface
Where a block sits decides what plays.
The prototype is an approximately 12 in. × 12 in. platform populated with large LEGO-sized pieces. Different positions on the platform correspond to different musical outputs. Moving a block to a position is how you play.
A light sensor detects whether a block is covering a location. The sensing feeds a microcontroller, programmed in C++, which drives a speaker to play the corresponding output.
- Place a blockthe user's action
- Location coveredlight sensor
- MicrocontrollerC++
- Speakermusical output
Confirmed components
- Light sensor
- Switch
- Microcontroller
- Speaker(s)
- C++ software
03Iteration
From buttons to light
The first input method asked too much of the user, so we changed how the system sensed a block.
First concept
Physical buttons or switches under the interaction pieces.
Problem
A piece had to be pressed down far enough to activate the button reliably.
Why it mattered
The interface depended on the user applying a precise amount of force and positioning.
Change
Moved to light sensing: detect whether a block covers the location.
Result
Placing a block is enough. No precise press is required.
04Prototype
Building the proof of concept
Mechanical design, fabrication, software, and testing, iterated quickly.
The team designed the parts in SolidWorks, designed a mechanical enclosure, and fabricated the prototype with 3D printing and simple shop tools. We wrote the software in C++, assembled the prototype, and tested and iterated quickly.
05My role
My part in the team
I contributed across concept development, requirements gathering, mechanical design, software, assembly, and testing.
- Initial concepting, and brainstorming with the client
- Requirements gathering
- SolidWorks and the mechanical enclosure
- C++ programming
- Assembly
- Testing
06Outcome
A working proof of concept
The project ended with a working demonstration of the proof of concept. It wasn't a finished instrument, but it showed the idea worked: a familiar, low-precision interaction can drive an electromechanical system that makes music.
The lasting lesson for me was about where the requirements came from. The most important input wasn't a specification; it was noticing what the student already enjoyed, and then choosing a sensing approach that didn't ask more of them than that.